
Gardening in Calgary 101
- Jennifer Hoglin
- Jun 25, 2020
- 26 min read
Updated: Oct 25, 2023

Hello reader! I know we haven't had a lot of time to get acquainted, so I don't know an awful lot about you. I'm not sure if you are a beginner or an advanced gardener. Or if you are new to the Calgary area. We do have some unique things to think about when it comes to gardening here in Calgary! I wanted to take some time and go over the basics to get everyone on the same page.
Prepare yourself, it is going to be a bit of a long one (sorry!). Feel free to scroll to whatever section you need most, or just refer back here when you run into questions elsewhere. Think of this one as a reference, if you ever see something new to you in the other articles. The goal here is to give you the confidence to choose plants appropriate for your space and then learn the skills to keep them alive and healthy. There is a lot to cover! Calgary specific weather and soil, orientating yourself in a garden centre, planting, care and maintenance of lawns, garden beds and all of your growing things. Ready? Lettuce begin... (sorry, couldn't help myself there)
Calgary Climate and Soil
In order to garden successfully in Calgary, we need to know its unique challenges. Knowing what to expect can help us be prepared no matter what Mother Nature throws at us. Calgary can be described as having a cold, dry climate. We have short, fairly hot summers, and long dry cold winters. The nearby Rocky Mountains have a large affect on our temperatures and precipitation.
Our growing season is defined as the time between our last frost in spring and our first frost in fall. All plants do the majority of their growing in this time, no matter if they are huge trees or tiny weeds. Calgary has an average last frost date of around May 23rd and an average first frost date of around September 15th. These dates may be slightly different depending on where exactly in Calgary you are located and the number of years used to determine your average. And don't forget that these dates are averages; each year is different! When making gardening decisions, go by what you see outside, not by the date on the calendar. If we do the math between our average frost dates, we end up with 114 growing days. Remember this number, as it is important when choosing annual plants, especially vegetables, for our climate.
Hardiness zone
Let's talk about our plant hardiness zone rating. There are two systems for classifying climate in North America. The U.S. Department of Agriculture uses a system based solely on the absolute coldest temperature reached. The Canadian system is far more complex. It uses seven different variables to determine zones, including precipitation and monthly minimum and maximum temperatures. The government of Canada published a new version of the zone map in 2014. It upgraded Calgary from a zone 3a to a zone 4a.
So why do we care about zones? Well, when we are choosing perennial plants (including trees and shrubs) we need to determine if that plant is hardy in our area. That tag should give you a range of zones in which the plant will do well. Too cold of a winter or too hot of a summer and that plant won't survive. So we are looking for a zone range that includes a zone 3 or 4. There a couple of things that can complicate this. Is that a U.S. zone or a Canadian zone rating? It makes a difference. Also think about where you live in Calgary. If you are inner city Calgary or close to the rivers, you can usually get away with zone 4 plants. If you live in the suburbs or just outside the city, you are still most likely a zone 3 and would be safer choosing plants for that zone. Also know that zone ratings, especially those on herbaceous perennial plants, should be used as guidelines, not what will or will not definitively grow in your garden. Experimentation is part of the fun of growing!
Chinooks
Probably the biggest challenge to gardening in Calgary is our chinooks. Chinooks are very strong, warm winds (up to 120 km/hr) that occur in winter here in southern Alberta. We usually have 30-35 chinook days per year. During a chinook, temperatures go from average winter temperatures to average summer temperatures very quickly. -20 C to +20 C within a 24 hour period is not unheard of. The problem for us gardeners is that these warm temperatures in winter result in greatly reduced snow cover. This means less insulation to protect overwintering plants. Increased evaporation also occurs, due to the rise in temperature and extreme winds. Chinooks can bring plants out of winter dormancy (even multiple times per winter). They result in physical damage from wind and severe dehydration stress to plants. Watering trees and shrubs really well before hard frost can help, but choosing plants that can deal with drought and desiccation is even better.

Hailstorm Alley
The second biggest challenge is hail. We saw this just a week or so ago. Hot daytime temperatures in summer, coupled with afternoon thundershowers often result in ice falling from the sky and wreaking havoc on our plants. Hail can be anywhere from pea gravel size to tennis ball size. You can imagine the damage a tennis ball size chunk of ice could do to gardens and property. Hail storms generally occur from mid June to late August, with a peak in mid- July. Keep a close eye on the weather forecast and be prepared with old sheets and boxes to cover those specimens that are most important to you.

Soil
Ask any experienced gardener in Calgary what their soil is like, and they will most likely sigh heavily and concede "clay". It's true. The majority of Calgary has a high proportion of clay in its soils. This has both pros and cons as a gardener. Clay particles are very small and fine. That means they pack together tightly and don't let moisture drain through. You can help your soil have better drainage by adding compost or any other organic matter. Gypsum or zeolite can help break up compacted clay soils as well, especially in lawns. The plus side of clay soils is that they are quite nutrient and mineral rich.
We have very alkaline soils too. Typically our pH is around 8.5. Our tap water is also fairly alkaline, so watering your garden with tap water will only increase the problem. Knowing we have alkaline soil is important in deciding what plants will do well here. Things such as blueberries and azaleas like very acidic soil and, as a result, tend to do poorly. It takes consistent high does of sulphur products and a small contained area of soil to get our soil to go from alkaline to even slightly acidic. And no, pine needles won't do it. Not even 40 years of built up pine needles.

Types of Plants
Let's start right at the beginning. When we walk into a garden centre, there are different departments of plants based on how and where they grow. Do you need a plant for your living room or a huge shade tree for your back yard? Of course there is nothing wrong with just looking around, but knowing what type of plant you need and for what exact space will help you find the perfect plant that will thrive.
Woody vs. Herbaceous
There will be a section just for trees and shrubs in every garden centre. These are the woody plants. Woody plants have solid stems or trunks that do not die down in winter. Trees have a single main woody trunk and shrubs have multiple woody stems sprouting from the roots. There are a few plants (such as Amur maples) that may be grown as either a single trunk tree or a multi-stemmed shrub, depending on how it is grown and pruned. Woody plants continually add to the width of their woody stems year after year and new growth (leaves and new woody branches) originate from these woody stems. Conversely, herbaceous plants do not have woody growth, only green pliable stems that die back to the ground in winter. All above ground growth is new and comes up from the roots or seed each year. Woody plants are almost always perennial and herbaceous plants may be annual or perennial.
Annual vs. Perennial
Annuals are plants that have only one growing season. Annual actually means "one year". They sprout from a seed, grow and flower over the spring, summer and fall, then die once winter hits. They must get their entire life cycle completed in one year. As a result, they tend to have significant growth and lots of flowers in that one year. They need to get all that reproduction stuff done quickly! Annuals are great for planters, pots and garden borders for lots of colour. Once they have wilted and died from the cold, you can completely remove them and get the pot or flower bed ready for next year's planting. They need to be purchased (or grown from seed) every year.
Perennials, on the other hand, come back year after year. The foliage dies back to the ground over winter, but the roots are still alive and put up new growth in the spring. Perennials tend to be slower growers and not flower as much as annuals, because they can spread growth and reproduction over a number of years, instead of having to get it all done in one. Once the foliage dies back in late fall or early winter, you can cut away the dead foliage to tidy up your garden. Or you can wait until spring to clean up the dead material like I do. It will help insulate the plant and provide shelter for beneficial insects if you leave it in place until spring (see the article Spring Cleanup in the Garden for more info). You should note that perennials tend to be more expensive than annuals. After all, you are getting a plant that will last years instead of months, and often one that has taken more than one year of care before becoming large enough to sell. Perennials must be planted in the ground to survive through our winters. They will not make it if they are in a container, even a very large one. They will also not survive in a raised bed if it has a bottom in it, such as wood or plastic sheeting. That is still a container. Perennials need to be able to grow their roots down deep where they are insulated by the surrounding bulk of the earth in order to survive our winters.
There is a little saying in the perennial world: "The first year they sleep, the second year they creep and the third year they leap!" I know, cheesy, right? But it is true. The first year after planting, perennials are working on developing their root systems. That is a good thing! They need good, strong, established roots to make it through our very tough winters. The second year they are just starting to get going, and the third year they go! That is why mature size for a perennial (the size written on the tags) is generally at the end of the third year.
There is one very important thing to note. What is an annual here in Calgary may be a perennial somewhere else. Many of the annuals we use in pots or borders are perennial in other parts of the world (Osteospernum for example is perennial in Africa). They just aren't hardy enough to make it through our winters here. They do, however, bloom enough in one year for us to value them as annual plants. Learning what plants are perennial here in Calgary is a big part of learning to garden here. Many growers from BC are surprised by the number of plants that are not considered a perennial here, but that grow easily year after year in their warmer climate. So if you are from BC, it's just mean to rub it in! Garden centres always have separate departments for annual and perennial plants to make it easier for you to plan your garden and ensure there is no confusion. If you need help with this, never feel bad about asking for clarification when you are in the garden centre. They are there to help and want you to be a successful grower!
Biennials are plants that live for two years. They grow in the first year, come back in the second year to bloom and produce seed, then die that winter. Many of our vegetables are biennials, such as carrots, beets and spinach. These will be found with all the other vegetables, usually in the annual department. Some foxgloves, hollyhocks and Sweet Williams are also biennial plants. Most often these readily self seed in the garden, making them worth the price. These are typically found in the perennial department.
There are also evergreen perennials. These are herbaceous perennial plants that stay green all winter long, even under the snow. Make sure you know if any of your perennial plants are evergreens. You want to make sure that you never cut them back (in fall or spring) as this will usually kill the plant. Most of the ground covers, Bergenia (elephant ears) and Dianthus are examples of popular evergreen perennials. When in doubt, check your tag or ask at the garden centre.
Keep in mind that all perennials have different life spans. Some are longer lived than others. There are trees that get to be hundreds of years old, there are perennials that live only two years (biennials) and there is everything in between. Knowing the life span of your perennials will help you plan your garden over the long term. And keep your confidence from getting shaken when your perennial flax or Shasta daisy only lasts for 4 years.
Seeds and Bulbs
These have their own department at the garden centre and what is available in it changes throughout the year. Late winter and spring will have all the vegetable seeds and many varieties of both annual and perennial flowers that do well from seed. Some of these can be planted directly in the garden (see the article on direct seeding) and some of them need to be started indoors in late winter and transplanted into the garden once it is warmer and they have grown a bit (see the article on indoor seed starting). There will also be summer flowering bulbs available, such as Gladiolas (my personal favourite) and Dahlias. These are flowers that are not winter hardy here in Calgary, so they are planted in spring allowed to grow and flower, then pulled up and stored indoors over winter. The bulbs can then be replanted the following spring. Edible bulbs can also be found at this time. These include onions, soft neck garlic and potatoes that are planted in spring and then harvested in early fall. Perennial bulbs, roots and corms such as asparagus, horseradish and Jerusalem artichokes are sold at this time too.
Fall brings a different selection in the seed and bulb department. At this time you will find a larger number of seeds used for indoor microgreens and sprouts (see the article Sprouts, Shoots and Microgreens for details). This is also when spring flowering bulbs are for sale. These are things such as tulips, daffodils and crocus that need to get planted in fall. They are winter hardy (will survive our winters) and will sprout and bloom in early spring. Like all perennials, you only need to plant them once and they will come back year after year. You will also find hardneck garlic at this time. It is one of the easiest and most rewarding food crops you can grow in Calgary, so you should definitely try them out! The bulbs are available in fall, as that is when they should be planted. They will overwinter in the ground and sprout and grow the following spring for a late spring harvest of garlic scapes and a late summer harvest of the bulbs (see the article Garlic - The Stinking Rose for more details).
Tropical Plants
Not surprisingly, this department includes plants from tropical areas. That means they are far too cold sensitive to survive outdoors in our climate. They require consistently warm temperatures and often higher humidity than our outdoor plants. Some may be able to handle our mid summer weather, but they will need to be brought inside for storms or extreme wind, and stay indoors for all of fall, winter and spring. You will also need to ensure no pests or diseases follow them back indoors, so keep them isolated from your other indoor plants before reintroducing them to the mix. In case you were wondering, plants that are perennials in our climate often do not do well as indoor plants, as they require a cold cycle (ie. winter) to grow year after year.
Read The Label
Before you think of taking home that tree, shrub or herbaceous plant, you need to make sure it will work in your space. Everything you need to know to make that plant grow well is on the label. Remember, there are no bad plants, only bad places for each plant. That Snow-on-the-Mountain will take over the world and have you swearing up a storm if it is planted in the middle of a sunny border with great soil. But it is absolutely perfect for the fully contained side yard with no sun and crappy soil.
Most labels will include the following:
Plant name: both common name and Latin/scientific name. Latin names are important as they are unique to each plant and can be used anywhere in the world. They include the genera, species and often variety.
Preferred sun exposure: full sun (over 6 hours of direct sun), part sun or part shade (4 - 6 hours direct sun), or full shade (less than 4 hours of direct sun). Indoor plants will often indicate direct or indirect light or specify a window direction the plant prefers.
Mature plant size: for annuals this occurs mid to late summer, for herbaceous perennials this is year 3 after transplanting and for trees and shrubs this varies greatly (the tag should indicate lifespan or when it reaches full size). Always space plants using their mature sizes! This is the biggest planting mistake I see. That blue spruce is going to get 15-20 feet wide, so for God's sake, don't plant it 5 feet away from your house!
Zone rating: this will only be on perennial plants (herbaceous or woody). It often appears as a range of zones (zone 3 - 7) or as a minimum temperature tolerance (hardy to -40 C).
Flower timing and colour: for plants that produce flowers the label will tell you the range of months it blooms in (or at least which season) and what colour those blooms are going to be.
Special characteristics: examples are: drought tolerant (only once established), good for pollinators, good for cut flowers, waterside or pond plant, deer resistant, may self seed or naturalize (code for invasive in some situations).
A couple of notes about zones: labels may use either the U.S. or Canadian plant hardiness rating which can be different; just because it is zone 3 will not ensure great growth (there are other factors such as humidity and wind tolerance); some companies don't bother testing in our very small zone 3 market, so the label may state zone 5 - 7 even though it grows fine here. Again, if you have questions, ask! Every once in a while try "pushing your zone" by trying something less hardy in a protected well-mulched area of your garden. You never know what may grow. My amazing aunt has been growing a zone 5 Smoke Bush in her Saskatoon garden for years.
Will plants grow in different conditions than listed on the tag? Usually yes, but they definitely won't grow well. So read the tag and pay attention to what your new plant needs. A happy plant will grow big and strong and give you enjoyment for many years. A plant in the wrong space will be leggy and small and very susceptible to pests and diseases.


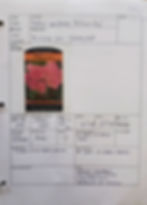
This Red Feathers (Echium amoenum) is a perennial that prefers full to part sun, grows 10-16" high and 6-12" wide, has red blooms in spring, will rebloom if deadheaded, is a good cut flower, is deer resistant and grows in zones 3-9. All that from the label.
Don't forget to keep those tags! No one can remember every characteristic of every plant in their garden. An envelope or binder will help keep them organized. The very simple "Plant Page" link in the References and Further Reading below is what I use. I have a page for every perennial plant that goes in my garden and I keep additional yearly notes on the back of each sheet. I have kept it as a Word document so that you can edit and personalize it to make it your own.
Planting
Usually, when we get our plants home, they need to be moved from the container that they are in to the ground outside, or at least to a prettier container (in the case of annual or indoor plants). Before you begin, ensure you have decent soil. In the garden, that means well drained soil with lots of organic matter. In a pot, that means fresh good-quality potting soil. Garden soil is too heavy for containers.
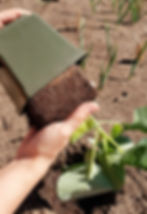
Dig a hole as deep as the original container and twice as wide. If it is a container, it needs to be at least as big as the original container. Fill the hole with water and allow it to sink in. This will help with transplant shock and give you an indication of how well your soil drains at the same time. Do not add fertilizer to the hole! Fertilizer can burn fragile roots. There are only two things you ever want to put in the hole and they are both optional. The first is bone meal. It will help with root development, which is essential for our new transplants. If we are planting outdoors, another option is to add Myke's to the hole. Myke's contains beneficial myccorhizum (kind of like filamentous mushroom root systems) that help your roots absorb nutrients from the soil. There are specific formulas for trees and shrubs, flowers and vegetables.
Now that our hole is ready, give your pot a squeeze all the way around to loosen the soil from the container. Place one hand over the top of the soil with the plant stem between your fingers to brace it. Don't pull your plant by the stem, as it is very fragile. If we break the stem, the whole plant is toast, so be careful while you are doing this! Flip the container over, remove the pot and place the plant with attached soil into the hole. Add or remove soil under the plant to ensure the top of the new soil will be at the same height as the top of the soil in the original container (in relation to the stem). We want to make sure the plant is at the same depth as it was in the pot. Backfill with the same soil you dug out of the hole. Water really, really well.
Planting a large specimen works in the same way, except on a larger scale. Keep in mind that a tree or shrub may require more than one person to manage. Very large caliper trees may require a crane. Ask if you are unsure. You don't need to remove burlap from tree roots, but I find they transplant better if you do, so cut away as much as you can. Wire mesh must be fully removed from root balls. Try to loosen and spread out the roots as much as possible once it is in the hole and ensure the specimen is at the same level as it was in the pot. If the tree is grafted, the graft union must be above the soil level. Here is a great video from Hardy Fruit Tree Nursery for planting bare root trees. And don't forget to lift with your knees!

Maintenance
Healthy plants are better able to deal with pests, drought and other hardships than plants in poor condition. That means planting them in their preferred location and ensuring that they are in good soil. That is essential! Good soil equals healthy plants. Soil is not only half of a plants environment, it supplies food (nutrients, vitamins, minerals and probiotics), water and air. Ideally, we want equal amounts sand, silt and clay particle sizes, lots of organic matter and an abundant amount of soil life. It's all those little guys in the soil that break down organic matter and make nutrients and minerals available to our plants. Various particle sizes allow for pockets of air and water dispersed throughout. Our plants need access to both oxygen and water in the soil. So, part of maintaining our plants will actually be taking care of the soil around them.
Watering
Every living thing needs water, and your plants are no exception. In general, plants need around 1 - 1.5" of water per week. This includes any precipitation that occurs naturally. This number will vary, of course. If it is hotter, more water will be needed and vice versa. And all plants will need watering when they are first getting established (usually the first 2 years or so), no matter how drought tolerant they are. Containers need even more water as they have a very limited storage space to draw from. In the heat of summer, they often need watering every day, sometimes even twice a day.
We also need to talk about water conservation. Here in Calgary, we are very lucky to have ample water supplies, but that doesn't mean we shouldn't conserve where we can. Here are a few things to think about implementing to save water in the garden:
Plant specimens with similar water needs together to make watering more efficient and ensure each plant gets exactly the amount it needs.
Using water from rain barrels saves you money on your water bill and has better water for your plants than water from your tap. It is softer water, less alkaline, at the perfect temperature and doesn't contain chlorine or any other chemicals.
Remember to water your plants, not your driveway or sidewalk.
Water your plants less frequently, but for longer periods. This encourages your plants to form deep roots that can more easily handle drought.
Think about including rain gardens, swales and fewer non-porous surfaces in your yard. The more water we allow to safely soak into our ground, the more water will be available to our plants in times of stress. And the more we will recharge aquifers and groundwater. All good things for our gardens and the environment.
Fertilizing
The world of fertilizers can be a confusing one, but here is a quick summary for you. All fertilizers have three numbers that represent, in order: N (nitrogen) - P (phosphorous) - K (potassium). Choose a fertilizer that has a higher proportion of the nutrient your plants need the most at that particular time. A fertilizer with 20-20-20 on it is a good option for an all-purpose fertilizer. If you are going to use fertilizers, please follow the instructions on the package for amounts and application timing. More is not better! More can kill your plants, so be careful and be precise.
Nitrogen (N) promotes leaf and stem growth (all the green parts). This number is high in fertilizers specifically for lawns or grains. Also available in compost and fish fertilizer.
Phosphorus (P) promotes root development and blooms. This number is high in fertilizers specifically for more blooms in annual plants. Also available in bone meal and myccorhizal fungi mixes, such as Myke's (see planting above).
Potassium (K) helps prevent disease, drought, cold and pest damage. Think of it as a boost to the immune system. Also available in potash and kelp.
As I have mentioned a few times now, I am not a big proponent of chemical fertilizers and here is why. Yes, they have nitrogen, phosphorous and potassium but they typically have nothing else. That's like you existing off of a multivitamin pill only, and not a very good one at that. Your plants need more than just three things to grow well. There are a host of other minerals and micro nutrients that your plants cannot live without. There is one thing that has it all. Can you guess?
It's compost! There is a reason gardeners call it black gold. Good compost will not only contain nitrogen, phosphorous and potassium, it will also contain all those other micro-nutrients and minerals as well. It will have lots of organic matter that will help with the texture and friability of your soil, as well as beneficial organisms to slowly break down that organic matter and make its nutrients available to your plants. Compost is the healthy and varied diet with lots of fruits and vegetables, while chemical fertilizers are the cheap multivitamin pill. Ideally, you should be adding 1 to 2 inches of compost to your beds yearly (we'll talk about lawns separately in a bit). You don't even need to mix it in, just lay it on top and let nature (and those soil organisms) do the rest.
Mulch
I go into quite a bit of detail on mulch in the article Weeds & The Evils of Landscape Fabric but here is a quick summary of why it is awesome. Shoot for a layer of 2 to 4 inches of carbon based (not plastic or rock) mulch on top of your beds. Don't forget to leave about an inch of mulch free area around each plant stem. Mulch helps by:
retaining moisture in the soil (preventing evaporation),
regulating soil temperature,
adding organic matter when it slowly breaks down,
promoting beneficial fungal ecosystems,
reducing the occurrence of weeds,
making weed removal easier when they do occur, and
looking good!
Deadheading
This is the process of removing flowers that are spent and past their prime. There are a couple of reasons we do this. Flowers are sexual organs, and once they have done their job of attracting a pollinator, they turn to seed production. That is fine if we want to save seeds, but if we don't, we would much rather have our plant spend energy on growth or producing more pretty flowers for us. Removing the dead flowers before seed pods form keeps the plant in flower producing mode (in terms of hormones). More flowers for us. In addition, cutting a flower back to a branch joint will promote new multi-stemmed growth. That means more leaves (more photosynthesis and growth for the plant) and more nodes for more flowers to grow from. Here is a good article from Gardener's World with specific details on how to deadhead. Or see the article on pruning coming soon.
Dividing perennials
Some herbaceous perennial plants tend to die out in the middle and start to get less vigorous growth over time. This is often a sign the plant needs dividing. All that is required is to dig up the entire plant and root ball, discard any dead areas, pull or saw apart the roots into 2 or 3 sections and replant those sections like you would any transplant (see planting instructions above). This helps rejuvenate the plant and leaves you with two plants instead of one. Remember, everyone likes gardeners because they are good at sharing! Not all plants will need dividing. Woody plants almost never do (that is trees and shrubs) and any plant with a tap root will very much resent you trying to dig it up. If you are unsure about your specific plant, always check the tag that came with it or ask at your local garden centre.
Cleaning up the garden
There are two schools of thought when it comes to cleaning up the garden. The first involves pulling up annual plants as soon as they start looking done for the year, cutting back herbaceous perennials as soon as their foliage dies back, and removing leaves the second they fall on the ground. Gardeners that clean up like this in the fall have pristine looking gardens going into winter and less work in the spring. But let me convince you there is a better way. I clean up all my plants and leaves in the spring, not the fall, because it has a number of advantages:
All that dead material insulates the plant roots underneath, helping them survive through our winters.
That dead material also traps additional organic matter and snow, adding to the insulative effect (we need as much help overwintering plants as we can get here in Calgary).
Beneficial insects make dead plant material and dried leaves their overwinter home. It's a good way to keep things like ladybugs in our gardens year after year.
Seed pods left in place on dead plant material are essential food for birds in winter and far more nutritious than purchased bird seed.
It is easy to tell exactly where there is supposed to be a perennial coming up in the spring.
Leaving the dead plants in place makes for great winter interest. The best example is the tall ornamental grass Karl Forster Feather Reed Grass. Please don't cut it back in fall! It looks absolutely gorgeous swaying in the breeze all winter long.
The only things I cut back in fall are any plants that were seriously diseased. Those go into the black bin. I also ensure there aren't too many dead leaves on the lawn. A few is okay, but the rest I rake into my garden beds to help insulate over winter. In spring, I wait for a couple inches of growth on each of my perennials and chop off the old dead growth just above that new growth. The dead material from from this goes into my compost bin, as does the dead annual plants I pull out. Dry dead leaves can also go into the compost bin, be left on garden beds as mulch or (my favourite) be shredded with the lawn mower and used as mulch in my veggie beds. This is fantastic organic material so don't waste it! Yes, this way involves a messier looking garden over the winter season, but I believe it is worth it. See the article on Spring Cleanup for more details and pictures.
Lawns
Lawns are probably the area of the garden with the highest energy expenditure needed to keep them looking good. That would be energy in terms of our effort and cost. Here is a relatively simple schedule to care for your lawn that will keep it looking good without the use of chemicals.
In spring aerate, top dress and repair:
If your lawn is compacted, aerate it first thing in spring, once your soil is dry. Aerating wet soil will only compact it more. You can hire someone, rent an aerator or use a handheld aerator.
Rake and loosen grass lightly with a leaf rake. (Do not dethatch or power rake, it does far more harm than good.) Overseed with grass seed and top dress with 1/2" of very fine compost or garden soil. Water consistently until grass seed germinates. Make sure you use grass seed that is for cool climates and for your specific light levels (a shade or sun mix). If you use a good quality compost at this time, no further fertilization of your lawn is needed.
If you have clay heavy soils, an application of zeolite or gypsum may also be added at this time. Both help with breaking up clay. Follow the instructions on the package for amounts.
If you have a ton of weed seeds that land on your lawn, corn gluten may be applied 2-4 weeks after the grass seed, once all your grass has germinated. Do not apply it earlier! Corn gluten inhibits seed germination and if your grass has not germinated yet, it will prevent it from doing so. Also keep in mind that corn gluten only prevents weed seeds from germinating. It will have no effect on already existing or perennial weeds.
Maintain throughout the growing season:
Mow as needed. A mulching mower will return grass clippings to the lawn to decompose and add organic matter back where it is needed. No, it does not increase thatch production. A height of about 2" is ideal for lush lawns that minimize water evaporation. Lawns that are too short dry out quickly and allow for more weed growth.
Water deeply and infrequently to encourage deep roots. About 1" per week (or 1.5" per week for high clay soils) is perfect. Try to water in the early mornings or evenings to maximize absorption and prevent excess water evaporation.
In fall:
A second application of zeolite or gypsum may be applied in fall for lawns with very high clay proportions.
Lawns take work to look good. Grass, especially fescue (the main type of perennial grass in our grass seed) is meant to go brown and dormant in mid summer when it is hot and dry. It's just part of its life cycle. To counter that, you must add copious amounts of water and nutrients. That is why lush green lawns are not ideal for our climate. Take a look at the article on lawn alternatives coming soon.
A Quick Pep Talk
I know everyone craves a perfect looking garden, but there are a few reasons why that shouldn't be your goal (besides it being flat out impossible). A few weeds in your garden are not necessarily a bad thing. Dandelions are often the only source of pollen for bees early in the spring. It's okay to have a few in your lawn. Keep in mind, that many of those plants labelled as weeds are food and shelter for our beneficial insects. It is also okay to have a few insect pests in our gardens. They are food for those beneficial insects that we want to hang around. The use of non-selective pesticides kills all insects, the beneficial ones and the harmful ones. And, by the way, there are far more helpful insects than harmful insects. Walk around your garden often. Observe what is doing well and what isn't, then think about why. Catching problems in the early stages will make them easier to solve.
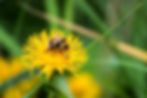
The aim for your garden should be a fully functioning ecosystem that can react quickly if something goes out of whack. For instance, if one insect pest population starts getting too large, there is a number of established predator populations waiting in the wings to react and take care of the problem. Everyone knows ladybugs are great at eating aphids. How about we encourage ladybugs to exist full time in our gardens instead of having to purchase them once aphid populations get out of control? We do this by having shelter and food for them year round (dead plant material and allowing some aphids), not using herbicides or pesticides, and encouraging diversity in what we plant. We cannot kill every living thing in our gardens, except a few species of select plants and then expect those plants to thrive in a sterile environment. Diversity in plants, animals, insects, fungi and micro-organisms is key to a healthy backyard ecosystem.

I also want to take a moment here to address a truth about plants. They are living things. I know we all know that, but it is important to really think about what it means. Living things are genetically variable. That means, even if they are the exact same species and variety, they have differences, just like people do. Some may have more or less pest resistance. Some may have a slightly different colour flower. Some may be more vigorous. Some may just have a stronger will to live than another. It happens. Plants will be unpredictable and you may not get the exact perfect specimen you are expecting in every single plant. And that is okay! That is the beauty of variation, whether it be a fantastic new flower shape that hasn't been seen before or an extra small full grown plant. That is how new varieties are often developed after all. But it also means that sometimes plants die with no apparent explanation. We can rule out a harsh winter, disease, pests, or the wrong sun exposure and still not know why something died. All gardeners kill at least a few plants! It does not make you a bad gardener if something doesn't make it in your garden. Try to figure out why it died and learn from that. Try again with that plant if you feel it is still worth growing. But don't ever, ever give up on gardening just because you killed something. Gardening is a life-long learning process.
Last but not least, remember to enjoy your garden! Get out there and walk around as often as you can. Ensure you have seating areas throughout your garden so you can relax and enjoy the fruits of your labour. Pun intended. Tilt your smiling face up to the sun, feel the vitamin D being absorbed through your skin, and smell that damp, earthy, green aroma!

Yummy gardening everyone!
References & Further Reading
Government of Canada Plant Hardiness Site (http://www.planthardiness.gc.ca/) for detailed zone maps and plant specific maps by zone.
Eldorado Weather (https://eldoradoweather.com/canada/climate2/Calgary.html) for in depth Calgary climate information.
https://www.veseys.com/ca/canada-hardiness-zones-frost-dates for last frost dates for your specific locale.
Penner, Lyndon “The Chinook Short Season Yard” 2014, Brush Education Inc., Canada
West Coast Seeds "Soil Basics 101" (https://www.westcoastseeds.com/blogs/garden-wisdom/soil-basics-101?fbclid=IwAR1DSMTDX__cQIfCrOqlKXOtWxFcD1L-gQTUE9Kp9p2Qka-uV4-9xHqKpxY) January 22, 2018
Xerces Society "Leave the Leaves" https://xerces.org/blog/leave-the-leaves October 6, 2017
Here is the link for my plant information page:
don't forget your local garden center!